

How To Make Own Set Top Box
Build It: Your Own Super-Charged Set-Top Box
Put Intel'southward Next Unit of measurement of Computing to work as a combo streaming unit of measurement, DVR, retro-gaming station, and more.
Length of Fourth dimension: 1–three Hours | Level of Difficulty: Easy
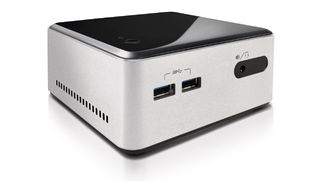
Yeah, information technology's cute—but this wee unit runs circles effectually your off-the shelf set-top device. If you detest a cluttered home-theater setup, put Intel's Next Unit of Computing to work equally a combo streaming unit, DVR, retro-gaming station, and more.

A PC in Disguise
Forget Chromecasts and Rokus—sure, they're cheap and like shooting fish in a barrel, but they besides have decidedly abrasive downsides, too. (First and foremost, the inability to utilise a proper physical keyboard and mouse to navigate around; 2d, stripped-down
interfaces for services like YouTube and Netflix.) And why buy a TiVo and exist stuck with both a subscription fee and a
stock-still amount of space? Let'due south not fifty-fifty get into the pitfalls of investing in something like the Ouya for emulated retro gaming.
We certainly can understand wantingconvenience, only at that place'south no demand to trade in the ability to pick your parts (and later upgrade them) to do then—not when y'all could use an Intel NUC as an HTPC. If you're a fan of tiny footprints and want a rig that'll do the chore of a Roku three plus a ton more than, merely with less interest than our July 2022's Thin Mini-ITX build, we'll walk you through the build besides as testify you how to put it to work. Bonus: it'due south simple enough that your more tech-savvy relatives can put one together on their own.

1.) This particular NUC supports up to 16GB of RAM in dualchannel mode; slide in the Then-DIMMs here. we put 8GB in our unit of measurement, but could upgrade down the route if need be. 2.) Insert the mSATA drive at an angle, then anchor it via a single Phillips screw. we picked an Intel 530 for this detail rig considering it was handy, merely any volition work simply fine. 3.) the mSATA drive, like in the first-generation of NUCs, sits over the wireless card. dissimilar the previous gen, yous won't need to worry about information technology overheating, though. 4.) This double-decker NUC has a divide tray for a 2.5-inch drive. nosotros grabbed an sometime 750GB drive, simply volition likely upgrade to a 2TB one afterward on.
NUC Parts, Gather
If you're a seasoned veteran of our more than challenging Build Its, putting together this item NUC will feel like kid'due south play. The just things that need to be added are an mSATA SSD, a mechanical hard drive, and RAM—that'due south it. This 2nd-generation NUC is a barebones kit that comes with a snappy Core i5-4250U dual-core CPU with Intel HD 5000 on-board graphics, and a pre-installed 802.11AC and Bluetooth iv.0 card.
Commencement, open the case by unscrewing the lesser console's 4 Phillips screws and and then pulling it off. Set it aside, and then gently pull up the two.v-inch HDD tray and either fl ip information technology over or twist it off to the side to admission the motherboard. We opted to install the RAM first—for this build, we grabbed two 4GB Crucial SO-DIMM sticks we had lying effectually. The NUC's motherboard tin accommodate upward to 16GB, only we don't think more than than 8GB is necessary right now.
Insert each SO-DIMM at an bending, then push the RAM downward until it's captured by each slot'south artillery. (To remove, only gently pull on both of the arms with your fingernails or use a pen.) Next, slide the mSATA SSD at an angle into its slot (it's positioned over the wireless card), then press it downward and secure it with a single Phillips screw.
We selected a 180GB Intel 530 for our mSATA SSD, which is a little roomier than our usual minimal requirement of 128GB However, we wanted a touch more than storage space to use for games—partially because of the faster loading times, and partially because we'll be dedicating the 750GB mechanical hard drive solely to DVR storage. Slide the 2.5-inch bulldoze into its bay, and secure it with two screws.
Supplant the 2.five-inch HDD tray over the motherboard, taking intendance to seat it properly and then the top of the 2.5-inch HDD lies flush with the lip of the chassis. Before putting the lesser panel dorsum on, note the two circular notches on the side of it that'll confront the HDD tray. The one that isn't a complete circle should be matched with the post that sits direct next to the mechanical hard bulldoze, so that the panel lies flat when reattaching information technology.
One note for system boot—for whatever reason, our NUC'southward UEFI interface recognized the mechanical hard bulldoze as the sole UEFI kicking device, while the mSATA SSD and our external DVD drive appeared only under legacy BIOS boot devices. That made for some amusing moments when trying to kicking to the DVD drive subsequently our trial install of Windows eight. Our solution? Nosotros disabled UEFI boot devices birthday.

How To Make Own Set Top Box,
Source: https://www.pcgamer.com/build-it-your-own-super-charged-set-top-box/
Posted by: rubinlailme.blogspot.com
0 Response to "How To Make Own Set Top Box"
Post a Comment